The Skeleton in My Cupboard–Brownies

I’m not sure I’ve ever had a more perfect example of a love-hate relationship than the one I have with brownies.  What’s not to love, right?  They are fudgy, chewy, crispy, crunchy, chocolatey, gooey, and delicious.  They make me happy.  They’re perfect alone or with ice cream, any temperature, at any meal.  And usually *usually* one is enough.  Whether you prefer the middle or the corner, with nuts, with chips, or au natural, brownies are a winner.  Unless you’re me and you can’t figure out how to bake a good batch.  Then, they’re your nemesis.

I’ve tried SO MANY recipes, and they all promise to be foolproof, only adding to my shame when I screw them up.  Do you have any idea how embarrassing it is that the mix you can buy for $2.99 in a box at the grocery store tastes and looks better than my homebaked, expensive, high-end, chocolatey expression of love?  What’s a girl to do?  I turned to the internet and some trusted baking sites, some favorite cookbooks, and some less fancy chocolate.  I aimed for simplicity.

Image

Flour, sugar, chocolate, butter, eggs, vanilla, salt.

That’s it.  It should have been so easy, so fast, so delicious.  20 minutes at 400 (I even have an in-oven thermometer!), then into an ice bath to cool.  Granted, I was supposed to use an 8×8 metal pan, which I don’t own, so I used glass, then put the brownies (on foil) into a different container so as not to shatter my pan, but still.  The center was raw.  Not in that good, ooey-gooey way–in a gross, drippy, uncooked, raw way.  You guys, I *like* brownie batter.  And when I say I like batter, I mean there is no need to wash the bowl when I’m done with it.  (I’m sure J is cringing as he reads this, grateful that I don’t lick bowls in public and wishing that I didn’t admit to doing so in private all over the internet.)  I do not fear salmonella.  I had every reason (after my overbaked, dry mess last time*) to love these brownies, even if they were a little underdone.

*Below – the last, terrible batch

Image

I did not like them.  Once again, I went to the altar of internet searching and begged Google to help me.  Multiple baking chats reassured me that this was a common problem and said I could put those babies back in the oven to firm them up, just as long as I was careful not to overbake them.  15 more minutes (nearly double the original time) helped a little, but only a little.  They tasted better, but they didn’t look too pretty and they fell apart when cut.   As you can see in the photo above, my last batch looked lovely, but didn’t taste good at all.  (Seriously, we threw them away.  I NEVER waste chocolate.  This hurt.)

Just once I’d like to bake brownies that taste AND look nice (and wouldn’t be better off hidden under multiple scoops of ice cream!)

Image

So back to the drawing board I go.  Brown Eyed Baker’s Baked recipe, buh-bye.  Baking Bites Perfect Fudgy Brownies, ciao for now.  (I may return to you once I own a metal pan, and next time I’m mixing far less so as to keep that sugar crystallized to make a nice crust.)  I’m not sure where to go next, but I’m not giving up.  I have learned to make a buttery, flavorful pie crust.  I have mastered both chocolate and vanilla cakes, something many professional bakeries don’t get right.  I’ve got a repertoire of muffins, cookies, frostings, and specialty items.  Brownies, I’m coming for you.

The night wasn’t a total loss.  Boo made sure we were still smiling in spite of my brownie-tastrophe and J’s endless school work.

Unlike the cats in this video,

Boo entertained herself without harming anyone or damaging anything:

Image

Love.

Lemon Love

I recently took a trip to visit some friends who I haven’t seen in quite some time.  I often joke about my “Gypsy Feet,” a benefit of which is that I have made friends around the world.  It’s hard not being able to see them with any frequency, so I’m always grateful for the opportunity to reconnect and for the technology that helps us stay in touch in between visits.

Last weekend’s trip ended in an email exchange that left me laughing out loud and ready to bake.  My friend T’s daughter, who infamously once corrected a statement about her sweet tooth by noting that she has a mouth full of them, has turned into quite a baker.  She generously gave her mother permission to share her recipes with me.  Cinnamon babka: “It resembles a massive cinnamon bun with golden raisins.” is a future experiment.  (Did you catch that?  MASSIVE CINNAMON BUN!) Yesterday though, was all about the lemon, specifically, Giada De Laurentiis’s lemon ricotta cookies with lemon glaze.  As you know, I’ve been on quite a lemon kick lately.  A few weeks ago I made lemon bars, which J doubted, but then ended up loving.  Last night he confessed that he’d doubted these cookies too, which he also ended up loving.  It turns out, somewhere along the line, he decided that he didn’t really like lemon desserts or icing on his cookies.  Though I’m not sure I’ve ever met a lemon dessert that I didn’t like, I can understand his aversion to icing on cookies.  I’ve had a lot of dry, bland, or floury cookies that tried to hide under cloyingly sweet icing.  In fact, I’d actually tried making ginettes before, both lemon and vanilla, with little success.  The internet has all kinds of suggestions for this problem including additional eggs or the addition of vegetable shortening, but Giada seems to have found the best solution–ricotta cheese.  I remember falling in love with Martha Stewart’s orange-ricotta pancakes years ago, so I was confident that this, too, would be a success.

Behold!

photo-4

I began by assembling my ingredients.  T had mentioned that they double the zest the recipe calls for, which, if I make these with ricotta cheese again, I will also.  I had the thought that I might be able to make these healthy healthier by substituting Greek yogurt for the ricotta cheese.  It does nothing to absolve us of the butter, sugar, or flour, but at least they’ll be probiotic and full of vitamin c and protein. (Maybe that will help me  fill up faster and thus eat fewer of them?)

photo-5

I followed the directions, scooping 2 tbsp of dough for each cookie.  They didn’t spread or shrink really, so the finished product looked nearly identical to the raw dough.  I think they’re a bit too big, and will likely only use 1 tbsp scoops next time.  (That will make a lot of cookies!  I got 37 out of this batch.)

photo-7

The glaze was easy to make.  Hooray for my Kitchen Aid mixer!

photo-6

And the finished cookies dried as promised.

photo-8

You’ll notice there are only 11 here.  I baked 12, but had to taste one before I even managed to take the picture!  To save me from myself…no, J, I did NOT put the cork on the fork.

I used my flash-freezing trick.  I scooped out the rest of the dough on parchment paper and placed it on a cookie sheet in the freezer for 30 minutes.  Unlike chocolate-chip cookies, which freeze to a solid block, these guys stayed soft.  They were a little more finicky to wrap in plastic and store in the freezer bag, but not terrible.  We’ll see if they bake up as nicely after being frozen.  The leftover glaze is in the fridge, where I think it will be fine.  My plan is just to bring it to room temperature before using.

When I announced that in addition to attending a 2-hour yoga workshop, my plan for the weekend included baking these cookies, J asked about the occasion.  A new recipe is occasion enough for me!  A now, speaking of pancakes…I’m off to brunch.  Happy eating!

Celebrate all Occasions with Pie!

Or balloons.

March 12, 2011

Image

Personally, I love birthday cake.  I mean I love all things birthday and all things cake.  All kinds, all reasons. (Don’t get me wrong, I also love cookies, brownies, mousse, crisps, crumbles, breads, and all other gluten and glucose laden foods.)  Pie, however, I came to appreciate later in life, having had an unfortunate blueberry pie experience as a child.  *What?!?*

*******************************************************************************************************************

Houston, Texas sometime in the early 80s

“Time for my after school snack,” she thought to herself happily.  “I could have chips and queso, or cheese and crackers; hmmmm, let’s see what’s in the fridge.”  She opened the door of the side-by-side refrigerator, perhaps expecting to find some leftovers from dinner or maybe some coldcuts, and broke into a toothy grin.  Right there on the middle shelf, at arms reach, but just high enough that she couldn’t see all the way inside, sat a pie.  As she pried the foil off the top, the dark, gooey center called to her.  “Mmmmm, chocolate pie.”  With only a brief thought that this might be for an occasion and thus, she shouldn’t eat it, she dipped her index finger inside and with eyes closed in anticipated bliss, licked her finger.  But the delight she expected was instantly replaced by revulsion as she tasted something unfamiliar, and definitely NOT chocolate.  Sadly she learned that this unpleasant surprise was blueberry pie.

*******************************************************************************************************************

Although I still suffer from intense disappointment when reality does not meet my expectations, I have since learned that blueberries are delicious in many forms, including pie.  But I have to confess that it took me a long time, and vanilla ice cream training wheels to learn that.  In any case, here we are tonight, celebrating with pie.

Yesterday was J’s birthday.  Those of you who know me well know that birthdays MUST be celebrated.  There is always much hoopla, many treats, fun times, and presents!  (Unless Hurricane Irene blows up your plans or your birthday is on the first day of school.  Then you just wear a monkey-festooned badge announcing to all who encounter you that you are the Birthday Girl.)  J doesn’t always share my belief that birthdays are so special. (I must interrupt myself here to note that when J and I disagree, he’s almost always right.  Yes, I just posted *that* for all the world to see.)  In this case however, he couldn’t be more wrong.  Once a year, those who love you are granted the opportunity to lavishly display their gratitude, to remember for themselves and to demonstrate to you how lucky they are to know you and how happy they are that you know them, to celebrate you.  And as the birthday boy or girl, you get to appreciate another day and another year, with all the promise that the future holds.  Birthdays rock!  But I try to respect his wishes, so I kept my promise that there would not be a surprise party.  I didn’t send anything to his place of work, nor did I encourage his students and colleagues to make a fuss (this year, see photo above for evidence of my previous bad behavior.)  I simply had a lovely dinner with him and gave him some gifts.  (And sent multiple “happy birthday” themed texts throughout the day.  A girl’s entitled to some indulgences!)  At the insistence of our neighbors, J and B, we will also have a belated celebration both of his birthday and the end of grad school this weekend.  But yesterday, I didn’t even make him a birthday cake.  Before your eyes bug out of your head, know that I offered.  Someone at work had made him a cake, and he insisted that he’d had enough sweets for the day.  Besides, he admitted, he’d rather have birthday PIE.

So today that’s exactly what he got.  And coincidentally, tomorrow is Pi Day!  (Middle school teachers are such dorks!)  While J diligently wrote lessons, logged internship hours, and drafted essays for grad school, I hung upside down at yoga class and baked pie.  (Other than a minor burn and a nick on my finger–rough day in the kitchen for me–I definitely got the better end of that deal!)  In the One Girl Cookies cookbook I found the perfect inspiration for a recipe–strawberry rhubarb pie with a twist.

Image

I’ve always associated strawberry rhubarb pie with summer.  I love the balance of sweet and tart, the fresh bite of the berries against the soothing cool of vanilla ice cream.  But Dawn Casale of OGC had an interesting idea.  She added orange zest to the filling and made an oat crumble topping that included crystallized and ground ginger alongside ground nutmeg to build a bridge between the warm winter fragrances and the fresh spring berries.  Considering that today is the day we removed our martenitsi, the timing was perfect.  (For more on the Bulgarian tradition, see here.)  So, having seen the first cardinal of the season, the crocuses and daffodils blooming, and the first flowers on the cherry tree, we celebrated his winter birthday and the beginning of spring with a seasonal pie.

Image

I made some changes to the recipe, first omitting the recommended crust and instead using my favorite, the Smitten Kitchen all butter, really flaky pie dough.  Additionally, I added a little extra rhubarb and left my slices on the large side because I like the tartness and the texture.  Lastly, I substituted 1/4 cup of almond flour for 1/4 cup of all purpose flour in the topping recipe because I wanted a little less floury flavor, and I thought the almond would be a nice addition with the oats.  The end result is a beautiful blend of tart, crunchy rhubarb and sweet, soft strawberries, light, flaky pie crust and crispy, spicy crumble.  It’s a little wet inside…next time I’ll probably pre-bake the pie crust a little, and make the bottom a little thicker.  (You can see in the picture that I had a little excess on the sides and definitely misjudged the shrinkage, thus, my crimping job is “homemade” in appearance.)  Perhaps in the future I can find a way to vent it a little bit too?  It’s not the prettiest pie I’ve ever made, and luckily, it doesn’t have to be because it’s not being presented as a whole.  This time, all that matters is that each slice tastes delicious, and it does.

Image

Pies for birthdays?  Pies for spring time?  Pies for Pi Day?  Pies for dinner?  You bet!

Feeling Tropical

Today is Presidents’ Day.  This usually kicks off a week of vacation in my profession.  Most people escape the cold, dreary, New York winter by heading to tropical islands to take the chill out of their bones and add a sun-kissed glow to their skin.  I usually head to Eastern Europe.  I’m sure you’re shaking your head and wondering why anyone would EVER want to go to former USSR satellites, much less why one would go there in February.  You should know, first of all, that the parts of Eastern Europe I’ve been to and lived in are actually quite beautiful.  You can read about some of my adventures here.  I’ve met some wonderful people, learned interesting customs, seen amazing history and geography, and even eaten some incredible food.  (J is reading this thinking, “They have no cuisine.”  J, I offer you a complete meal of deliciousness:  shopska, doners, and tikvenik.  Def.)  Ah, but I digress….  This year, there is no vacation, and thus, no traveling.  Instead, there is only a 3-day weekend and I chose to spend my break away from teaching as a student.  Today I attended two classes, cooking and yoga (I like to think the yoga gives me serenity, grace, AND burns the calories from all the cooking, baking, and eating.)  My cooking class was a citrus class, which was a lovely follow-up to the citrus dessert I made yesterday.  I didn’t plan it this way in advance, but I guess I did my best to bring the tropics to Brooklyn.

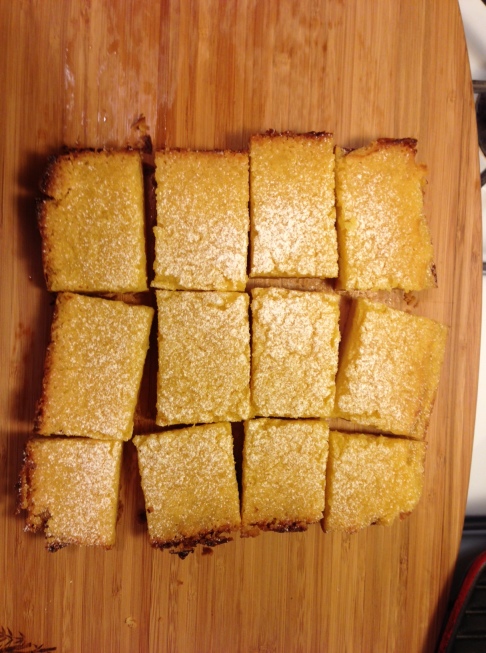
So let’s get down to the reason why you came here – dessert.  Yesterday was my first foray into lemon bars.  Usually I go for chocolate-based desserts, particularly those laden with sugar and flour.  (Chocolate cake is my all-time favorite, followed closely by chocolate-chip-cookies, chocolate souffle, and brownies.)  Perhaps it’s the mid-winter blahs, perhaps even my sweet tooth has been satiated, perhaps it was simply the subconscious effect of having lemons sitting on my counter, but something inspired me to deviate from my usual path and bypass the chocolate for the citrus.  

Image

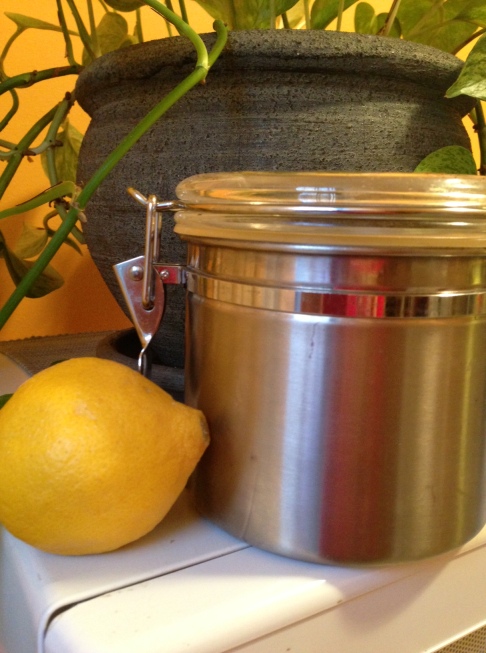
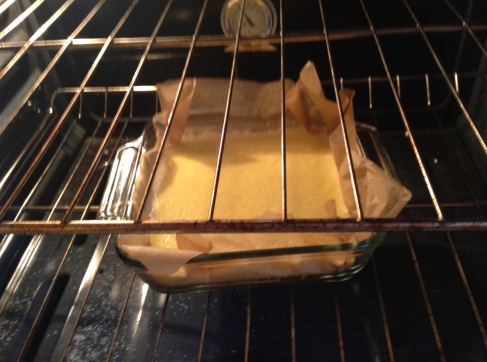
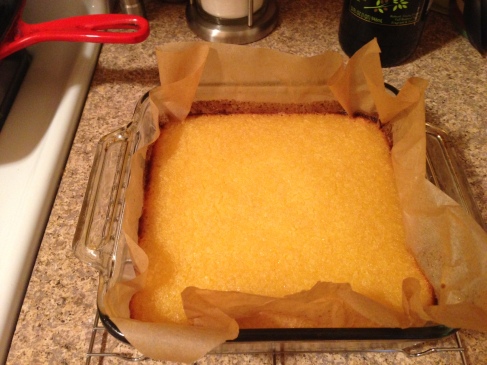
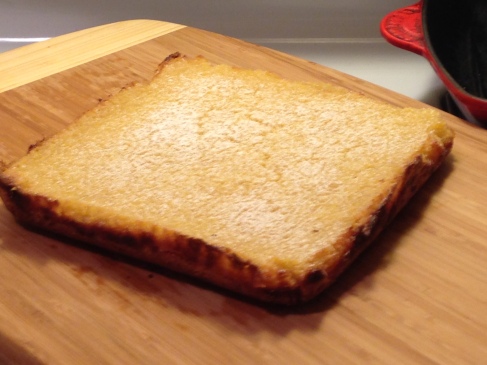
I’ve mentioned that lemon desserts aren’t usually my thing.  You should also know that J thought they weren’t his thing either.  This matters, because as anyone who cooks or bakes knows, much of the fun in creating food is in watching someone else enjoy eating it.  But I am determined and J is a good sport, so lemon bars made the agenda, albeit with a dusting of skepticism.  Part of this was because the recipe was a little unusual, which of course is what drew me to it.  The recipe came from my Smitten Kitchen cookbook, and was an updated version of the one on Deb’s website.  (I feel like this is a good time to mention that Deb Peralman and I have never met.  I feel like we’re friends and thus on a first name basis after reading her book though, so there you go.)  The update is great!  Instead of zesting and juicing the lemon(s), which is a pain in the neck, all you do is throw the whole thing (pits removed) into the food processor.  Genius.  J was worried the rind would be too much and make the bars bitter, but they turned out to have the perfect amount of tartness to them.  This was a surprisingly simply recipe: the crust was made in the small food processor bowl, and the filling was made in the large bowl.  Few ingredients, few directions, and even fewer dishes–you really can’t beat that.  The ONLY downside to this recipe is that you have to wait for the cooked bars to cool completely before you can cut into them.  (Fully aware of my lack of willpower, we went to the movies during this time.)  And though a simple recipe is nice, the real test is how the finished product tastes.  I think these are delicious.  Even J, who did NOT say yippie or yahoo when I said I was making them, was pleasantly surprised.  He was expecting them to be drier and cakier, but instead found them to be soft and jelly-like.  We decided these are a lemon bar version of key lime pie.  Yum!  And J, who hears me tapping away from another room just said, “and by the way, they are better the second day.”  We’re storing them in the fridge, which also adds to the pie-like quality.  (I should mention that I did make a slight adjustment to Deb’s recipe.  I only had salted butter, so I used it and omitted all of the salt from the recipe.  I also added 1 teaspoon of vanilla extract to the filling, because everything is better with vanilla.)  Behold, my variation on Smitten Kitchen’s lemon bars:

Image

Image

Image

Image

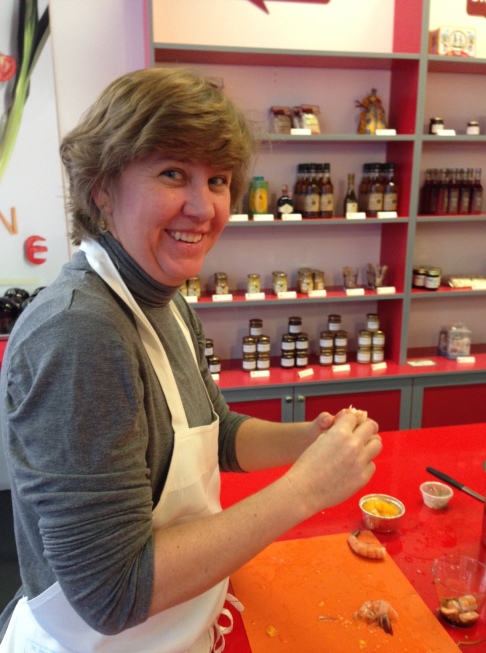
Then, today my friend, N and I took a class at Cook&Go in Chelsea.  The school originated in France and opened its first NYC outpost about four months ago.  We had a Groupon and figured it would be a fun reason to head into the city.  Details of the class are available here.  We met up a little early and hung out at Chelsea Market, where I was pleased to discover Amy’s Bread.  It’s a funny coincidence since J was reading one of his favorite cookbooks last night and looking at the dessert recipes.  He’d never looked at that section in all these years.  (To which I say, “Ha!  My plan is working!”)   Some day when I try one of the recipes from the book, I will tell you all about the delightful treats I tasted at Amy’s.  

But back to my class.  Silvia, who is from Brazil (yet another place I want to go,) was our instructor, and she was lovely.  We were lucky to have only four of us in the class, so there was plenty of personal attention and time to chat.  The school provided all the tools, aprons, and even wine while we worked!  The space was bright and open, and everyone who worked there was really nice.  I have to admit though, J and I have had quite a laugh tonight about the name “Cook” & Go, as we didn’t actually do any cooking in the class.  We did a lot of prepping, but the actual cooking part was all done at home.  

Image

Even the salad that was completed in the class was all cold.  Though the name is a bit of a misnomer, the class was fun and N and I will certainly be going back for a second.  (I’m hoping Silvia creates the healthy baking class we talked about with the gluten free menu and yoga component.  See, I’m not the only one who thinks yoga and cooking belong together!)

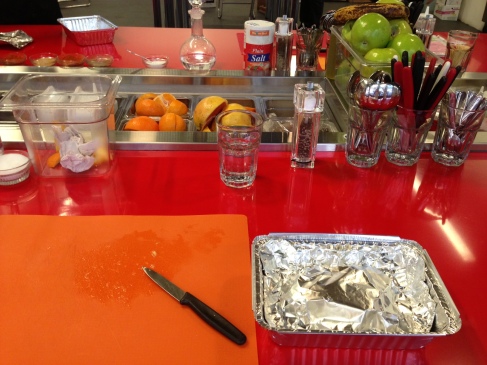
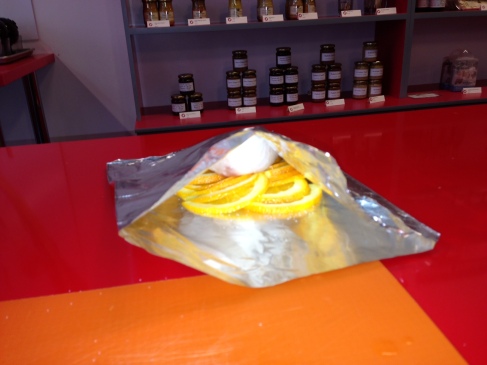
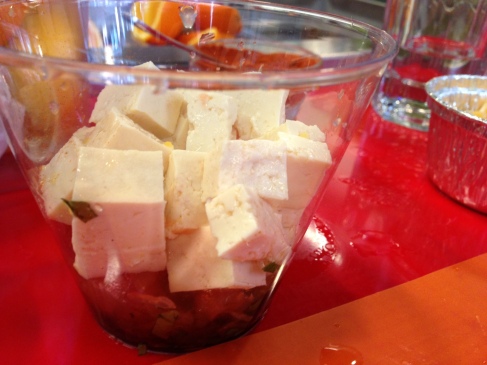
First, we made our entree:  Haddock a l’orange in papillote with a spiced oil garnished carrot puree in papillote.  (Because I knew I’d be bringing food home to share with J, who has a shellfish allergy, and because shrimp are just gross, I actually made a vegetarian version of this meal.  Instead of haddock, I used tofu, which meant instead of white wine, I used red-wine vinegar.)  Otherwise, everything was the same.  It was cool to learn the technique for cooking in parchment, as well as to learn that a simpler alternative of aluminum foil could be used:

Image

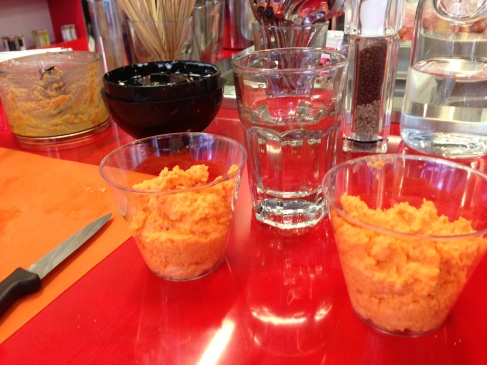
As a side, we made a simple carrot puree.  It’s always a party when we get to play with small appliances!

Image

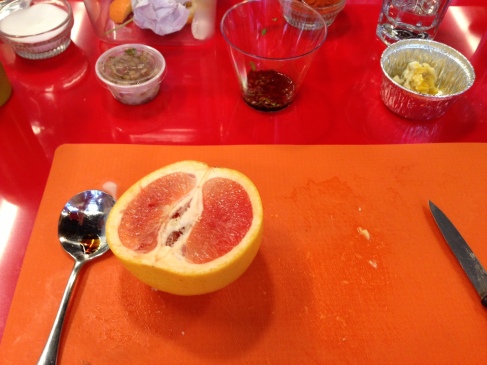
Next we made our appetizer.  This may sound backward, but as our teacher explained, it is logical to prepare the driest ingredients first, so as to minimize the number of times you have to wash your cutting board.  This dish was a grapefruit and prawn Thai salad, where again, mine was tofu.  It was described as: A refreshing appetizer to start this citrus menu. Prawns and grapefruit marry together with soy, cilantro, and mint for a delicious pop to start this meal!  J and I weren’t so thrilled with this one.  It was more of a relish than a salad, and we weren’t crazy about the soy sauce flavor with the grapefruit.  But it was fun watching everyone have to clean those nasty shrimp!

Image

Image

Image

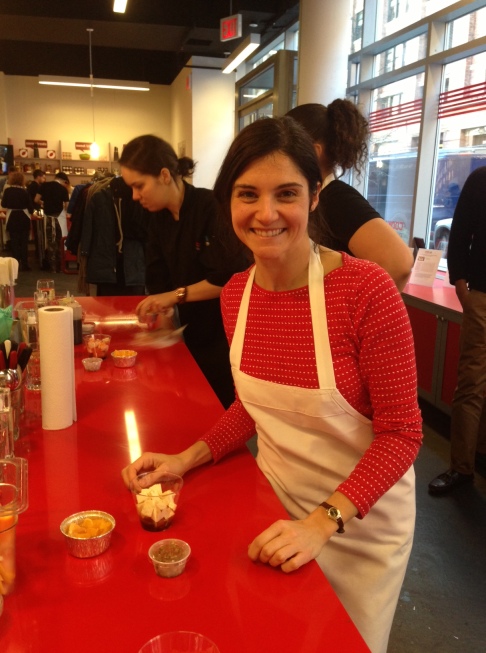
And then came dessert.  Even though I strongly believe fruit should NOT masquerade as dessert, the idea of a citrus fruit soup was appealing to me.  It was like a smoothie with the added delicious bonus of puff pastry on top, a smoothie pot pie.  YUM!  The soup was VGE style, which I had never heard of, but like the nerd that I am, I was excited to learn the history of this name: “this dessert pays hommage to Chef Paul Bocuse’s savory soup created for France’s 20th President Valery Giscard d’Estaing.”  The important lesson here is that if you are ever in a restaurant and the menu says “VGE,” it means there is a puff pastry cover!

Image

I should have taken a final picture of everything plated at home, but I didn’t think of that until I put the last bite in my mouth.  Oops.  Sorry.  For the record, because the course is portioned for a single serving, J and I added some baby bok choy and slices of Italian bread to round out our meal and make it enough for two for dinner.  (And perhaps it was the cold, winter’s night, but in our oven, both the tofu entree and the dessert needed to cook longer than the directions from the class had indicated.)  All told, it’s been a lovely long weekend of learning and a tropical touch to chase away the winter blues.  Here’s hoping spring comes soon!

Mardi Gras Comes to Brooklyn


I did it!  I overcame the slushy snow and cold temps, put aside my cozy jammies and blankets, and made my way to the supermarket to stock up on sugar.  (That I forgot the butter and freezer bags is irrelevant; what’s important here is that I got sugar.)  Why is this such a big feat, you wonder?  Because this sugar was the key ingredient to my personal Mardi Gras celebration.  Most years I am able to travel during Presidents’ Week, and most years I opt to go to Europe where Carnival is usually being celebrated with theatrical decor and tasty treats.  This year marks the first in many that I will not be traveling, so if you can’t fly the girl to Venice (or New Orleans or Rio or France or Spain…), bring the kings cake to the girl.  I looked up a lot of recipes.  Many of them looked festive, bedecked in purple, green, and gold, but not as tasty as I was hoping to find.  J remembered kings cakes as being dry and crumbly…not particularly appetizing.  I had a vaguely similar recollection and was certain I could find one we liked more.  I was right.  The recipe I found is French, and the cake is decadent and delicious.  This experiment included many firsts for me:  kings cake, puff pastry, almond paste.  In this house we have to put the cork on the fork practice safety first, so we opted to leave the bean/baby out of the cake.  And even with this precaution, there were a couple of other minor mishaps, including me forgetting that I neglected to bring my rolling pin with me when I moved, but a wine bottle solved that problem.  And I put a little too much butter on the sheet pan which smoked up our kitchen (and left it smelling like burned butter, which in my world equals the smell of pancakes, so yum!), but otherwise everything was easier than I expected.  I even had a little puff pastry left over for a future experiment.  I think next time I’ll make them mini kings cakes – individual portions, since they didn’t slice neatly and thus didn’t present as pretty as I would have liked.  I might also play around with adding fruit.  I think cherries would add a lovely tartness against the sweetness of the cake.  But for tonight, we’re just going to celebrate and eat cake!

Kings Cake or Galette de Rois

adapted from: http://www.bonjourparis.com/story/recipe-galette-rois-epiphany-cake/

INGREDIENTS

  • 1 package frozen puff pastry sheets, thawed according to package directions
  • 2 eggs
  • 1/4 cup almond paste
  • 1/4 cup sugar
  • 3 Tablespoons unsalted butter, softened
  • 2 Tablespoons flour
  • 2 teaspoons confectioner’s sugar
  • 1/4 teaspoon vanilla
  • 1/4 teaspoon almond extract
  • 1 dried bean (lima or kidney beans work well)
  • Pinch of salt

PREPARATION

  1. Preheat oven to 450°F.
  2. Butter a large baking sheet (not dark metal).
  3. In a food processor, purée the almond paste, sugar, butter and pinch of salt until smooth.
  4. Add 1 egg, vanilla and almond extract, then purée until incorporated.
  5. Add the flour and pulse to mix it in.
  6. On a lightly floured surface, roll out one sheet of the puff pastry into an 11.5 inch square.
  7. Invert an 11 inch pie plate onto the square and cut out a round shape by tracing the outline of the pie plate with the tip of a paring knife.
  8. Brush the flour from both sides of the round and place it on the buttered baking sheet. Put in the refrigerator to chill.
  9. Repeat the procedure with the second square of puff pastry, but leave it on the floured work surface.
  10. Beat the remaining egg and brush some of it on top of the second round. Score decoratively all over the top using the tip of a paring knife and make several small slits all the way through the pastry to create steam vents.
  11. Remove the first sheet from the refrigerator and brush some of the egg in a 1 inch border around the edge. Mound the almond cream in the center, spreading slightly.
  12. Bury the bean in the almond cream. Place the scored round on top and press the edges together.

TO BAKE

  1. Bake the galette in the lower third of the oven for 13 to 15 minutes, until puffed and golden. Remove from oven and dust with the confectioner’s sugar.
  2. Place oven rack in the upper third of the oven and return galette to cook for an additional 12 to 15 minutes or until the edge is a deep golden brown. Transfer to a rack to cool slightly.

TO SERVE

Serve the galette warm. Make sure everybody knows about the bean before eating!

Before:

ImageAfter:

Image

Et voila!

Enter your email address to follow this blog and receive notifications of new posts by email.

Gone to the hips…

Visitors

  • 2,084 hits